Have you ever wondered…
How many people contact you from your website in a certain period of time?
There are two methods
- You can create a “Thank you” page, so that people will get a very clear feedback that their form has been submitted.
- You can create a GTM tag that will send an event to your Google Analytics account.
Either option can be later measured as a Goal for Google Analytics so that you can measure stuff like how many of your visitors (from various channels and campaigns) have converted into leads.
Let’s jump to it:
Creating and monitoring a thank you page
The creating part depends on how your website is built. If you have followed my “How to create your own website in less than 10 minutes” tutorial, you’re going to be using WordPress.
That means creating a page is easy and all you have to do is write something in the lines of “Thank you for contacting us! One of our representatives will get back to you as soon as possible.”
Add a redirect code, while not impossible, is a bit technical:
<script>document.addEventListener( 'wpcf7mailsent', function( event ) {
    window.location.replace('http://yourwebsite.com/thankyou');
}, false );</script>
Just copy-paste this code right under your form in the Contact Form 7 form editing interface and you’re golden.
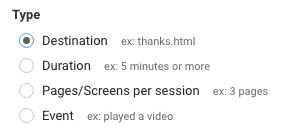
This Thank you page has its own URL, and therefore you can create a Google Analytics goal measured by Destination as seen in this screenshot:

Now in the next screen just insert the Thank you page’s slug, or path, like this:

This means that from now on, every visit to this page will be counted as a conversion, and can then be analyzed by channel or by campaign.
Sending an Form Submission event to Google Analytics
This is one requires a further step, but it comes instead of creating a page, in case you’re not interested in making your users leave the page they’re in.
That’s actually not so farfetched, since the Contact Form 7 plugin will automatically give the user a pop-up feedback to let them know their message has been sent successfully.
Using code
Instead of adding the redirect code from above after the form, insert this one instead:
<script>document.addEventListener( 'wpcf7mailsent', function( event ) {
ga( 'send', 'event', 'Feedback', 'Contact Form' );
}, false );</script>
This code will send an event notifier to Google Analytics, which will simply appear in the Events section.
Using GTM
Google Tag Manager is there to help us insert tags into our website without using code, which sounds absolutely fantastic! So let’s:
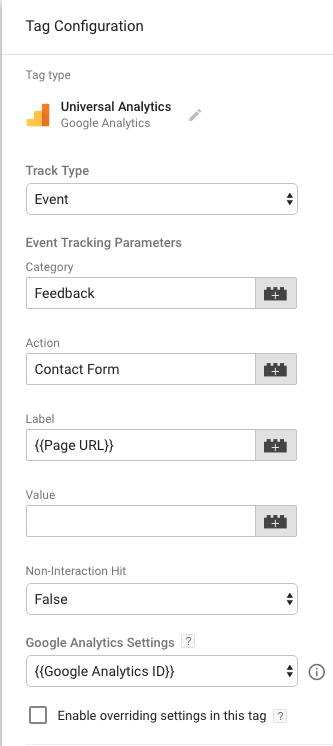
Create a GA Tag as follows:

As in the code above, “Category” and “Action” are customizable as you wish.
We have added the page url element to the “Label” just like in my “How to monitor your Call us button” article.
Measure the event as a goal
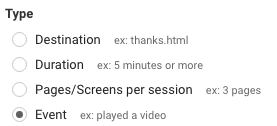
The next step is to create an event based goal in Google Analytics so that you can measure where people who have contacted you, came from.
This will be done in the Administration area of Google Analytics. Just add an event based goal

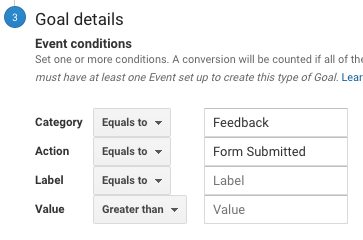
and fill it out like this:

We are not inserting anything in the “Label” element because we don’t want to filter the event by page url, meaning we don’t really care here where the form has been filled.
That’s it
Now you will see your event in the big-table-filled-with-numbers-and-such in the different areas in Google Analytics and will now be able to define which channels bring you leads, and which campaigns worked best.

