Stop estimating whether your website works or not
Lead generation and conversions (Like clicking on a Call Us button) are our main goal when doing digital marketing. It costs money and time. So why guesstimate and hope for the best when you can verify and analyze?
 Shay, you know you’ve already convinced me. So how are we going to go about measuring a Call Us button usage?
First off, we’re gonna need to know what exactly we’re gonna be looking out for:
In HTML5, a link that will start a phone call will be a simple Anchor tag (<a>) which will contain the keyword “TEL:” followed by our phone number in the HREF attribute. If you remember, we already used the “MAILTO:” keyword inside the Anchor tag’s HREF attribute in my previous article when we customized the Share via email action.
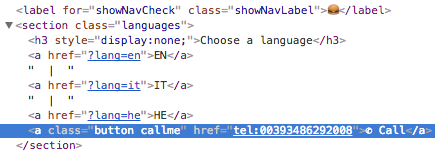
The HREF attribute is our Click URL which is where the user will be redirected. Normally it’s another web page, but this time it’s a phone call, thanks to the “TEL:” keyword inside the HREF attribute.
Using the Google Tag Manager to transmit the Click action to our Google Analytics account
Another thing we have already seen in a previous article is the Google Tag Manager which we have used to install Google Analytics easily on our website.
We’re gonna create simple tag which will monitor the Click to call event and send not only the event itself, but we’re gonna also note on which page the conversion took place.
If you remember, I just wrote that we’re gonna use the A tag’s Click URL inside the HREF attribute to verify the Call Us button has been clicked. So first thing, we’re gonna add this variable to our default variables list.
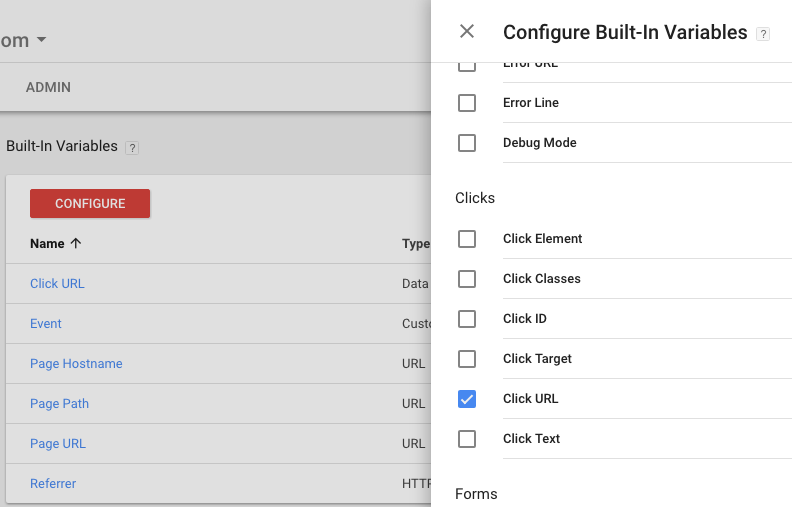
Now that we’ve got our variables set, let’s get on with the creation of the Tag.
Creating the Event Monitoring Tag
After choosing the Universal Analytics type tag, you’re gonna want to change the Track Type to Event because we’re not tracking page views anymore, but click events.
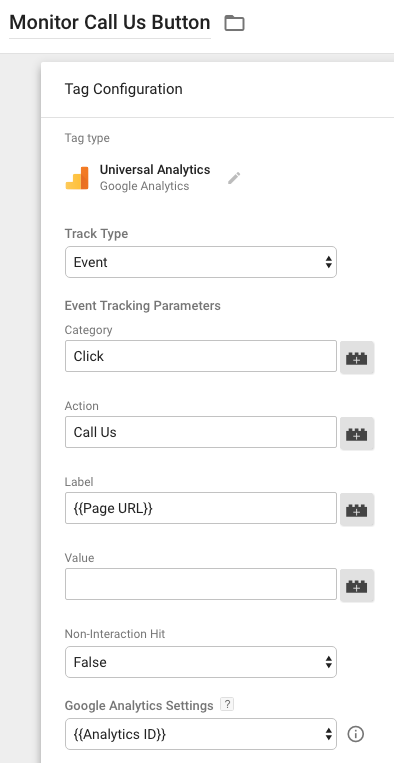
The spaces are going to be filled like so:
Category is the type of event. In case you’ll want to monitor other click events, calling this category Click will put all the click events under the same index.
Action is the type of click, so since we’re monitoring the Call Us button, I just called it Call Us this time.
Label is usually used for further specifying the type of click, but that would be redundant this time. Let’s just insert the Page URL variable dynamically by clicking on the Lego icon on the right and choosing it from the list.
Don’t forget to select your Google Analytics ID from your variables in the bottom there, so that GTM will know where to send these events.
Creating the Trigger
Last time we have chosen the default “All Page Views” trigger that Google has already prepared for us, to monitor on analytics. Now we’re going to create our own trigger, so let’s do this step by step.
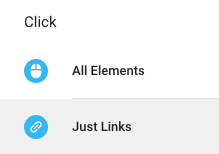
Choose the Just Links trigger from the Click category, so that when links are clicked the trigger will fire.
Right now any link clicked on our website will fire the trigger, so let’s change that and make it fire ONLY when our Call Us button is clicked.
Instead of leaving the All Links Clicked radio button checked, let’s check Some Link Clicks instead.
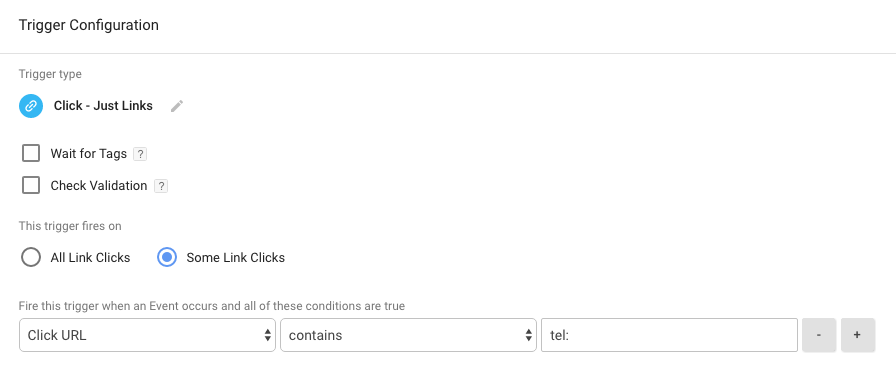
Now, as we said before, we’re going to specify that the Call Us button was clicked by checking whether the Click URL contains our TEL: keyword. So let’s make sure that the Click URL variable is chosen on the first dropdown and that the keyword “TEL:” is written in the last text field.
Last step: Add the event as a Conversion Goal in Google Analytics
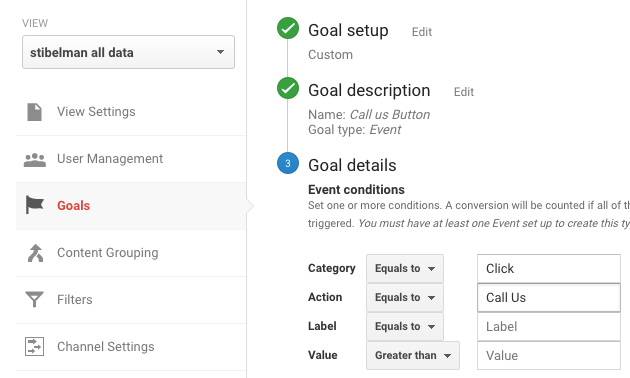
Move to Google Analytics and open your Goals panel in the Administration area.
Create a new custom goal with Event as the type, just like in GTM.
Under the Category and Action text fields, insert the same words we have specified in GTM and leave the Label empty, since that’s gonna change every time.
That’s it! Now you will be able to measure and analyze where and when your Call Us button is pressed so that you understand better how your website is used, and where it needs fixing.


2 thoughts on “How to monitor your Call Us button”
Comments are closed.